We are so thrilled (and blessed) to have purchased our first home! Leaving Tiburon will not be easy - we practically wake up in paradise daily - but the idea of setting roots in our own place is very exciting! After months of trying to purchase in another area of the East Bay - we are heading back to our hometown of Walnut Creek, California. This market is crazy and we kept losing out on several offers so we decided to switch up where we were putting our offers in - and it worked. We were both raised in Walnut Creek (met in the halls of intermediate school) and loved growing up in this town. It was a smaller town then -we didn't have a Neiman's - but it's still a very charming place to call home and we are grateful.
Our 1400 square foot ranch style home was built in the 1960's and needs a lot of work. We have so many plans for it- but like everybody- budget constraints will keep us from doing all of our projects at once. Keeping things organized- we have set out a timeline of projects we will conquer and over x amount of time (of course things will get shifted around - new things added - projects removed - but having a plan in place is key).
Thankfully my dad is a contractor (slash- already screening my calls -ha) and is generously offering to give advice and help us on some key projects (thanks Dad! and Sorry in advance!). I'd love to document our process on the blog for a diary of each project along the journey to making this house our home. Plus- I love a good before and after!
I should preface these posts by saying I am by no means an interior designer, a decorator, or an expert in this scope of work - so this should be a very interesting process for you all to judge. My only experience is growing up in a house with a contractor- life experience (constantly decorating on my own- my sister and I use to re-arrange our furniture on a weekly basis)- a few interior design classes- retail gigs in the home furnishing world- and a corporate job at Restoration Hardware where part of my job was helping people reselect items/offer minimal design advice in the Contract Department (Hotels, Restaurants, Office Buildings, etc.). I expect some mistakes to be made (hoping for not many) and lessons learned!
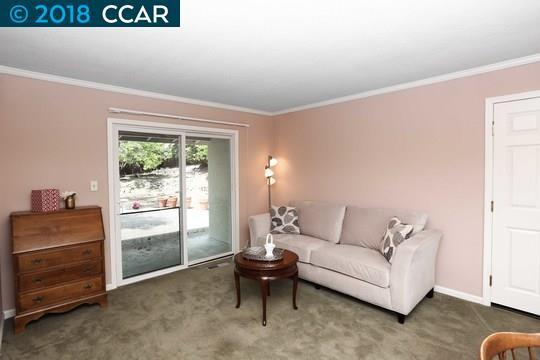
Without further ado... here are some before photos to give you an idea of what we are working with. This house is a big blank canvas (yay!) and my mind is racing with soooo many ideas- but I have to keep organized in this moment and stay focused on only these first phase projects. Unfortunately- I don't live in Waco, TX - so this is going to take a while :)
Lastly, we have not spent much time in this place/moved in yet so we expect many more tiny projects to make their way into the first phase!

The first photograph is from google maps - and the second is from the listing. They had just put a fresh coat of paint up.
Keeping budget in mind through all of these projects, our only exterior projects in the short term will be to:
1. Remove the large shrub
2. Paint the shutters
3. Paint the door
4. Replace the roof :(
5. Add a few plants/flowers
Next up is what I'm calling the family room or "fireplace room". You walk through the entry and immediately to your right is the kitchen- but if you walk forward and to the right you end up in this room:
Phase 1 of this room will be to:
1. Tear out the carpet and reveal the hardwood below (fingers crossed it's salvageable- we will know soon)
2. Paint the walls and baseboards
3. Paint the fireplace and sand down the mantle/stain to lighter
4. Remove double doors
5. Remove shutters (far right second photo)
6. Remove drapery rods
Walking through the double doors- you end up in what I'm calling the "dining room" for now.
Phase 1 of this room:
1. Paint the walls
2. Paint the ceiling/kitchen ceiling
3. Remove the double doors
4. This floor does NOT have hardwood underneath so we will be tackling this project on our own with guidance from my dad. This will be a very inexpensive option as Phase 2 of this room will be that the wall separating the family room to the kitchen will be torn out.
5. Lighting swapped out with something inexpensive (temporarily) until we gut the kitchen
6. Remove the rod
Next up is the kitchen:
Phase 1:
1. Paint the ceiling
2. Paint the cabinets
3. Paint the tiny pantry closet
4. Paint the small area of baseboards by door
That's all for the immediate moment on the kitchen because it will be eventually gutted. Knowing myself - I'l wake up one day and start DIY-ing the ish out of this room despite it's eventual demise.
Bedrooms are next. They all look about the same other than the closets. This is the Master. Through the left door is a small walk in and the right door is the Master Bath.
Phase 1:
1. Paint the doors/casings and baseboards - keeping this wall color for now
2. Tear up the carpet and refinish hardwood floors
The Master Bath. Across from the vanity is a tiny shower and to the left of that is a tiny linen closet.
This entire bath has to be gutted next year so anything we do is just to freshen it up in the meantime:
Phase 1:
1. Remove wallpaper
2. Remove Medicine Cabinet and towel holder
3. Paint Walls
4. Paint Vanity
The Hallway bath has to be gutted as well:
1. Remove towel bars
2. Paint walls
3. Paint vanity
Again- this entire bath will be gutted next year so we will not do much other than paint.
The backyard:
The best part of the place is the large flat backyard. We looked at a lot of places with minimal yard so we are stoked to have this much space. We think of something new every single day for this yard! We have very big plans - but for now - nothing is happening here for a long time. We will do some very small inexpensive things but these aren't even built into phase 1 projects yet.
The other very unsexy phases of this project that you can't see but have to be done:
Phase 1:
1. Roof replacement (you can see it but it's not sexy)
2. Drainage
3. Small foundation work
Phase 2:
4. Plumbing
5. Duct Work
We have our work cut out for us! Excited - scared - and overwhelmed all at once but looking forward to moving forward. Will check back in as we complete some of these smaller projects.
We move in at the end of the month... wish us luck!